
Pixl Plus is an ad campaign type in Feathr that allows you to choose a campaign objective and have your target audience catered to your needs—offering demographic-based 3rd-party audiences or targeted 1st-party audiences. By combining the strengths of Retargeting, Email Mapping, Lookalike, and Affinity campaigns, Pixl Plus reduces the need to run separate campaigns while offering enhanced group selection tools and more detailed targeting options.
Follow the steps below to publish your Pixl Plus campaign.
Note: 3rd-party audience targeting for Pixl Plus is not available for Feathr Lite license types.
1. Choose your Project
Click on the Project where you want to run the campaign.
2. Choose your Campaign
Next, click the "+Create" button at the top right of the page. If you want this campaign to be part of a marketing funnel, choose or create a Flight and click the + button in a Leg.
Then, click on the Pixl Plus icon.
3. Name your Campaign and Choose your Channels
We recommend describing the audiences you're targeting and the call to action of the ads. For example, "Email List & Website Visitors -- Fall Donation Drive." This is not a requirement, but best practice for naming campaigns in Feathr.
After naming, you must choose the channel(s) within which your ads will display. Display advertising refers to ads shown on the general web, whereas Meta Advertising shows ads specifically on the Meta Platforms (Facebook and Instagram).
To get the most out of your Pixl Plus campaigns, select both channels and maximize your reach.
4. Select your campaign objective
Choose “Build Reach & Awareness” if your objective is to expand your message to new audiences. Choose “Deepen Engagement” or “Drive Conversions” if you want to target groups of the first-party data available in your Community Database or email lists. The objective you choose will dictate your choice of audience.
5. Choose your Target Audience
If you’ve chosen “Build Reach & Awareness” as your campaign objective, you will be able to build your 3rd-party audience by selecting from among several demographic choices, such as age, special interest, and geographic location. You will also be able to choose the size of audience you want to target. Using these options, you can build your ideal 3rd-party audience.
For other campaign objectives, you will select a 1st-party Group as your target audience. For help building Groups, check out this article. Simply put, Groups are custom collections of tracked audience members. Individual audience members in a Group can be people who have:
- visited your website (or otherwise tracked by the Feathr Super Pixel)
- people known by imported email addresses.
A Pixl Plus campaign will also work to serve ads on as many known devices across your selected target audience as possible.
It is common to select multiple Groups in a Pixl Plus campaign. Click the + Add Target button to target multiple Groups.
If you plan to target audience members based on email addresses, we recommend that you import email lists directly into your Community Database prior to drafting your Pixl Plus campaign. Only import audience lists that you have permission to send emails to. Even though Pixl Plus campaigns do not send emails, importing lists creates records in your Community Database, and if you choose to run Auto Send email campaigns in the future, these audience members could receive automatic emails from you.
Check out this article for help with importing your email lists into Feathr.
After you've selected your Targets, click Next to move forward.
6. Add Filters
If you’ve selected “Deepen Engagement” or “Drive Conversions” as your campaign objective, Pixl Plus campaigns provide many options for further defining your audience. You can filter by location, age ranges, and range of interests.
Note that the use of any Filters will always decrease your audience size for the campaign. This is because the campaign will start with the first party data you target in the previous step, then filter it down to just those people who belong to the filter groups you choose here.
If your group selection has over 5000 people in it, you also have the option to expand your 1st-party audience by adding in a “lookalike” audience. This is an audience of 3rd-party data that has characteristics in common with your selected 1st-party audience, making them good targets for the same campaign and allowing you to reach more people with the touch of a slider.
Pixl Plus campaigns are considered nurturing campaigns, and your known audience have likely already shown considerable interest in your messages.
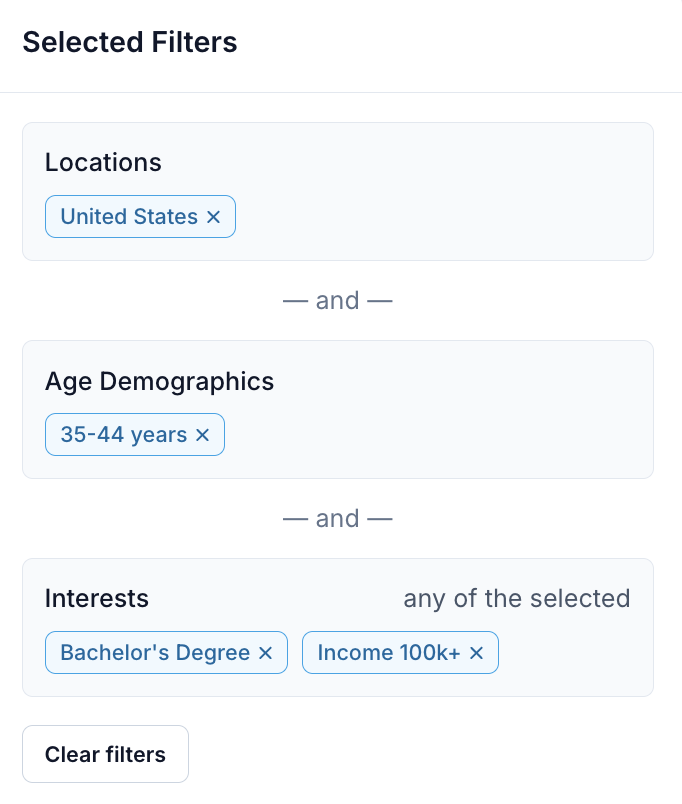
Note the "-- and --" between each of the filter types, and the "any of the selected" in the final section. Location, Age, and Interests utilize And logic in relation to each other. In the example above, the audience members that will be targeted in this campaign must be located in the United States, and be between 35-44 years old, and have either a Bachelor's degree or an Income over $100k.
7. Creatives
"Creatives" refers to the ads that will be shown to the audience of this campaign.
First, establish the Destination URL of the creatives--this is the URL your audience will be sent to when they click on an ad. Optionally, add alt-text (alternative text) to allow your ad creatives to be read by screen readers and increase the accessibility of your ads.
To assign creatives for this campaign, click on the Add Creative button at the bottom of the page.
If your creatives are saved as files on a hard drive, you can simply uploaded now by selecting Add Image/Video Creative . Alternatively, you can choose creatives that have already been added to Feathr by selecting Duplicate Existing Creative.
Add all of your creatives to the campaign and select Next to continue.
8. Set a Budget
This will also determine the start date and end date of the campaign. This is the time frame in which your ads will be shown to the audience.
Once you've set your dates, Feathr will automatically recommend you a budget. If this is your first Pixl Plus campaign, we highly recommend that you use the recommended budget. You can think of Feathr's recommended budget as a minimum amount you should spend on the campaign in order to improve the probability of a successful outcome. Budget can also be adjusted after the campaign is published.
Pixl Plus campaigns are able to be run as soon as the next day.
Check the payment method attached to this campaign and make any adjustments if needed.
Click Next on to move on.
8. Conversion Tracking
If this is one of your first campaigns, we recommend moving past this step without setting up conversion tracking. Feathr's native campaign reporting will provide many valuable metrics to help you understand the health of your campaign. If you want to add conversion tracking to your campaign, check out this article to for instructions.
Click when you're ready to move on.
9. Publish your Campaign
Review the campaign settings and when you're ready, hit the button. Congratulations!